Replacing Oakley Lenses: How to Do It Properly?
Believe it or not Oakley first started manufacturing motocross hand grips, but not just any kind of hand grips – these were made from unobtainium rubber. This improved the grip of the handles and paved the way for motorcycle handles as we know them today. Five years after the company’s revolutionary product, in 1980, Oakley started making their first motocross goggles called O-frames.

Source: Oakley
These provided a wide field of view and they were an instant success too. In 1983, Oakley released their first ever ski goggles which were followed by the iconic Frogskins in 1985 – Oakley’s first ever lifestyle sunglasses. There are a lot of other Oakley glasses that have come out thorough the years and it’s quite convenient that their lenses can be replaced quite easily.
Contents
Types Of Oakley Lenses
Tinted
Although all of Oakley’s lenses are made to provide excellent UV protection, you can replace your pair of Oakley clear lenses with tinted lenses. These are the most affordable option but provide a lot of contrast and sun protection too.
Transitions
Transition lenses are very convenient when it comes to blocking the sun rays as they darken when exposed to sunlight. However, they won’t darken when you’ll be driving on a sunny day as in that case the UV light is blocked by the windshield instead.

Source: Pinterest
Polarised
If you want to eliminate glare, then polarised lenses are what you need. These lenses have a film inside them which allows light to pass through the lens only in a straight line. For example, when you are driving you won’t see reflections on a wet road, instead you will see the road clearly – this goes for all kinds of reflections.
Iridium Coatings
These coatings are infused inside the lens and can enhance different colours so you get sharper vision in certain environments. All of these coatings have a reflective quality and while some are purely a fashion statement, others are made to enhance certain visual aspects of activities like snowboarding, fishing and more.
Hot to Find the Correct Replacement Lenses
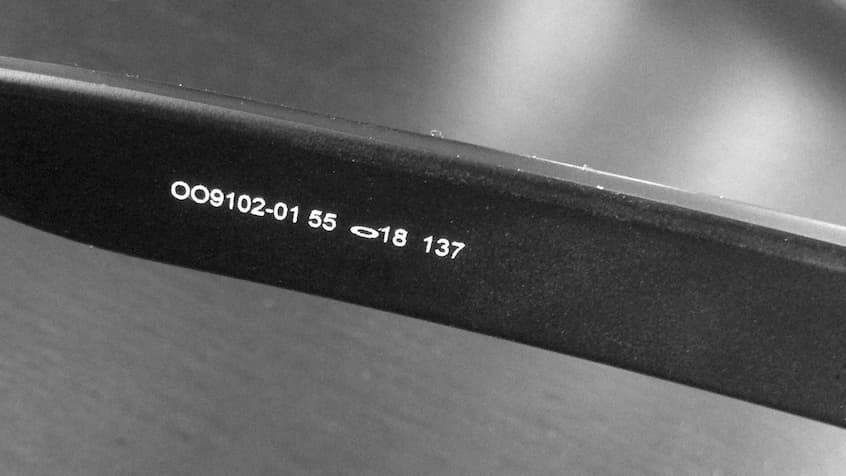
In order to find out the correct lens size you need to take a look on the inside of the arm. This is where the name of the sunglasses is, whilst the other information is further down the the temple arm. This is where it can get a little bit confusing. Older Oakley models had a NN-NNN format. After that number, you can see the Oakley logo with two numbers next to it, one in front and one after the logo. The former is the eye size and the latter is the bridge size.

Source: OakleyForum
Newer Oakley sunglasses have a OONNNN or a OXNNNN format with the beginning (OO/ OX) being the brand name. The digits afterwards are model numbers which is all you need to find matching Oakley replacement lenses. The number after the dash represents the colour code and it is not a part of the model number. Here you also have the eye and bridge size in the same position as on the previous format as well as the temple length. Some models only have the temple size inscribed.
Can I Get Prescription Lenses for My Oakley Sunglasses?
Yes, you can get prescription lenses for your Oakley sunglasses with Oakley’s PRIZM lens technology. This technology is patented by Oakley and it makes for contrast enhancing lenses which are made for either sporting activities or to help you see fine details in everyday environments.
How to Take Out Oakley Lenses?

Source: OOLVS
When it comes to removing flak jacket Oakley clear lenses, place the index finger of one hand in the nose bridge and the thumb on top of the frame. While holding the lens with your other hand, start flexing the nose bridge towards you and pushing the top of the frame down at the same time. With the opposite hand just pull the lens out.
For fast jacket lenses, gently push down the switch near the left temple, take the lens between your thumb and index finger and gently slide it out of the grove. When sliding the lens out, start with the side closest to the switch. Half jacket Oakley lenses can be removed by gripping the frame temple with one hand and the lens with the other. Then just pull the lens tab out of the frame temple and remove the lens.
All M frame Oakley lenses can be removed by holding the centre of the frame and then pulling the lens out from the middle. Make sure to squeeze the centre of the frame and pop up one corner of the frame in order to lift it away from the lens.
How to Put in the New Lenses?
To put in your new flak jacket lenses, slide the outer lens tab into the frame holding the lens between your thumb and index finger, with your index finger bent inwards. Align the inner lens tab in the frame grove and then slide the lens gently into the grove. Remember to keep a firm grip of the lens and slide the thumb of the opposite hand along the top of the frame in order to place the inner lens tab. You will hear it snap when it’s in place. The same is done when installing half jacket lenses.
Fast jacket lenses are placed by sliding them into the lens slot with the side closest to the nose. Once you have them in place, just push the switch back upwards to lock them in position. You install M frame lenses by repeating their removal process but only in reverse.

